I made a point-of-sales system using Arduino, a receipt printer, a 20×4 LCD and a keyboard on October 13, 2012. I thought it would be a good exercise for me because I really wanted a reason to use the Adafruit receipt printer and I would have an example of an embedded systems project that was complicated enough to require a state machine. I’ve documented all the hardware and software below.
Table of Contents
Problem Statement
Design Choices
Microcontroller
Input Device
Output Devices
State Machine
Code
Schematic
Problems Encountered
RAM Ceiling
Receipt Printer Power Supply
Paper Jams
Lack of space on LCD
Level Conversion
Wires Breaking and Batteries Dying
Potential Improvements
Testing
Conclusion
Problem Statement
IEEE UCR sells parts kits every quarter to several sections of labs and classes. For each sale, a record must be kept and a receipt printed. Essentially, IEEE needed a point-of-sales system to replace the hand-written receipts and paper records.
Design Choices
Microcontroller
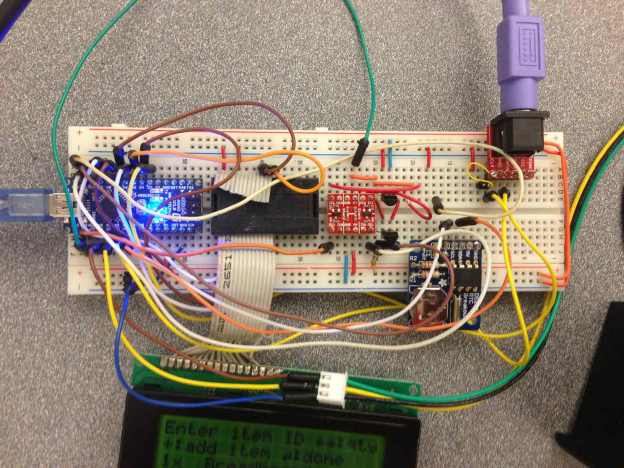
I chose to use an Arduino Nano (ATmega328) for its ease-of-use in prototyping. Connections to the other circuits would be easier if they were all on the same breadboard as opposed to an Arduino Uno. The Arduino also had many peripherals that were necessary for the project such as the SPI and just the right number of pins. On the software side, there were hardware abstraction libraries for almost all the peripherals I wanted to control.
Input Device
Typically with Arduino projects, input is limited to a few buttons or a keypad. In this application though, I need to input customer names and numerical item IDs. For this reason, I chose a full-size keyboard and the accompanying PS/2 breakout from Sparkfun.
I also elected to use a Adafruit DS1307 clock kit to keep track of the real time and date.
 Full-size Keyboard used for input |
 Left: Level converter used for SD card (not shown) Right: RTC used to keep track of time |
Output Devices
I chose a 20×4 LCD because I needed to display entire sentences and full names. The 16×2 LCD distributed in the CS120B Microcontrollers class was not large enough. This screen was much larger and I felt like I always had enough room to display instructions and a text field.

20×4 LCD Displaying the Item Entry State. The instructions are on the first two lines. The input prompt is on the bottom line. Here I entered “0” and it immediately displays “EE100A Parts Kit” on the third line.
For printing receipts, I chose the Adafruit Thermal Receipt printer and the accompanying library. It is a low cost printer that prints on to standard 2.25″ wide receipt paper, which is exactly what I needed. It costs about $50 as opposed to business-class printers that cost hundreds of dollars.

Adafruit Thermal Receipt Printer with 7.4V 850 mAh 20C battery for power source.
State Machine

It is also possible to press Escape on most screens and return to the previous state.
Code
All code may be found on: https://github.com/androng/Point-of-sales/
Schematic

Problems Encountered
RAM Ceiling
The most inhibitive problem was the RAM ceiling on the ATmega328. When I was putting the final touches in the code such as adding more items in the catalog array, the code would always crash if I added a fourth item and increased the “numItems” variable. It did not crash when I decreased the number of items. I could only attribute these errors to RAM problems.
I used the MemoryFree library to check how much memory I had, and it always showed a few hundred bytes free. However, I had approximately 201 bytes (10% of 2048 kB RAM) of global variables, plus whatever the libraries used. I am not sure if MemoryFree takes these into account. It is also very difficult to write an Arduino sketch without global variables. At the very least, I would have to use my own main.c and modify all my functions to use parameters.
I also had several global constants (“const byte”), which I am not sure were optimized away like #defines would be. I tried saving RAM by using the P() macro for Strings and used ((progmem)) on the IEEE logo, but the program still crashed.
This was the reason the SD card was not present–it was my last priority and having only a few hundred bytes left in RAM was not conducive to adding an SD card.
This was the only software problem I really had. The hardware abstraction libraries were written very well and were easy to use. I especially liked how easy it was to add the IEEE logo with LCD Assistant.
Receipt Printer Power supply
Finding a power supply for this printer was very hard. It must be powered from 5-9V and has a very large current requirement. Not satisfying this requirement would mean less heat generated and fading grey logos and text instead of crisp black ones.
Initially I tried using a 5V rail on an ATX power supply, but I am guessing it could not respond fast enough because I would still print choppy grey logos. The text was fine though. Eventually though, I settled on the 7.4V 850mAh 20C Li-po battery that I had sitting around, which turned out to be perfect for the job. All receipts I printed with this battery were black and crisp. I set my multimeter to “MAX” mode and it showed that the printer was eating 4.71 A at peak.
Paper Jams
The receipt printer will occasionally jam, forcing me to reprint the receipt. I had to code a “Reprint receipt?” prompt for this reason.
Lack of space on LCD
The LCD only has a few spaces for characters. This is fine and I worked around this several times by removing vowels and spaces when possible, but for screens like an order confirmation, it would have been more natural to see several lines of text at once.
Level Conversion
The level conversion for the SD card was a challenge. (I set it up before I hit the RAM ceiling) I bought a level-converting circuit from Sparkfun Electronics for this purpose, but I was not happy when I found out it was two MOSFETs for the up-converter and a voltage divider for the down-converting. The write signal was most important and having a voltage divider for my MOSI and CLK signals signals was not tolerable. I ended up using two 2N7000 MOSFETs as level converters instead according to this app note from Phillips.
Wires breaking and batteries dying
The fragile nature of the breadboard led to several headers breaking during transport. I also had some wires melt on me when I shorted the li-po battery. The battery for the RTC also died once, so I had to replace it and reprogram it using an entirely different sketch.

PS/2 breakout used for the keyboard. Notice the wirewrap job used to replace the broken header underneath.
Potential Improvements
- There is space for an order confirmation state that currently just skips itself to the receipt printing state. That would be useful to have even if I had to scroll with the limited amount of space I have on the LCD.
- Having an SD card to log to would be perfect, but I am almost certain that I require more RAM for this. The software support and external circuit is ready though.
Testing
I tested the printer in several EE1A labs and even a EE100A lab. In half the sections, the printer crashed and had to be reset, but otherwise would work just as expected. There was also a section where a wire from the LCD broke, which rendered the system inoperable. I had memorized the key sequence to print, but the code was non-responsive nonetheless. I believe I had the four-item code at that point. In the other half of the sections though, the printer would work non-stop and we could print twenty or thirty receipts continuously.

When the printer did not jam, it produced crisp black graphics and easy-to-read text.
Printing demo:
Conclusion
I made a point-of-sales system that worked reliably about half the time. To achieve 100% reliability, I would have to create a PCB and eliminate all wires, use another microcontroller with more RAM and add a battery-charging circuit so the printer would always have power. I am satisfied with what I created, even if it does not log to an SD card.

Hello iI’m also looking into creating a small Pos for my dad using the arduino so he can print out stuff. This looks like a great way to start it. Thank you. If you are doing anymore updates to this Please let me know.